ABOUT THE PROJECT
Patients that are bed-ridden in healthcare facilities often experience bed sores. Bed sores, also known as pressure ulcers, develop when there is too much pressure on the skin. I developed a pressure pad using a Raspberry Pi, and this pad could be inserted into the padding of any bed. The circuit was initially designed and tested using Fritzing and then built using a Raspberry Pi 3B+ , pressure pad, 1 MOHM resistor & an MCP3008 10-bit ADC on a breadboard. The overall concept uses an analog to digital converter as the sensors I was using were analog sensors and the ADC would allow me to use these kinds of sensors with the Raspberry Pi. This allowed me to get variable values from my sensors rather than just an on/off component. A variable value allowed me to do more such as checking how much pressure is being applied and performing a different function depending on the result.
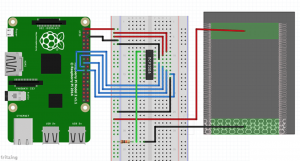
The wiring of the hardware using a Raspberry Pi 3B+ went as follows:
- VDD (Pin 16) wire this to 3.3V
- VREF (Pin 15) wire this to 3.3V
- AGND (Pin 14) wire this to ground
- CLK (Pin 13) wire this to GPIO11 (Pin 23/SCLK)
- DOUT (Pin 12) wire this to GPIO9 (Pin 21/MISO)
- DIN (Pin 11) wire this to GPIO10 (Pin 19/MOSI)
- CS (Pin 10) wire this to GPIO8 (Pin 24/CE0)
- DGND (Pin 9) wire this to GROUND
- Wire the pressure pad to 3v3
- Wire a resistor from GROUND to CH0
- Wire CH0 to the pressure pad
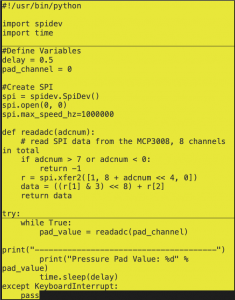
In order to create a script to collect values from the MCP3008 10-bit ADC chip, I used the following script: